This is the second installment in my Olympic lifting series for Girls Gone Strong and builds on some of the information from my first article on the snatch.
The clean, much like the snatch, is one of the best training options available for developing strength and power. It requires a little less speed but more strength than the snatch. The full-body movement teaches your body to work as a connected unit, improving your ability to perform complex movement patterns efficiently.
Performance benefits aside, how often do you really get to go all out and relish in the power of being aggressive and throwing some weight around?
Seventeen years ago, when I began weightlifting, the possibility of traveling around the world to share my knowledge and experiences in weightlifting just didn’t exist. Let’s be honest, finding anyone interested in learning the lifts was rare, especially outside of the athletic arena. Locating any instructional information was a challenge. Even YouTube wasn’t around until 2005 — six years after I started lifting! I owned a VHS tape from USA Weightlifting and that was about it.
Now, as interest in the Olympic lifts has skyrocketed, there’s no shortage of information available. Almost everyone has their own YouTube channel, and it can be overwhelming to know who to follow and learn from, especially for those who have little or no experience. The pursuit of Olympic lifting at any level is a continuous learning process and it’s best to start by creating a solid foundation. You may find it easiest to learn these positions and movements with a very light bar or even just a PVC dowel, but will probably find that you can work up to using the regular bar and even adding some weight relatively quickly.
Before diving into the key positions and movements of the lift itself, let’s review some foundational principles that will simplify your learning process and help prepare you for success.
Master Your Foundation
The four foundations that I shared in the snatch article also apply to the clean, with one addition. Preparation in these areas will make learning the lifts much easier:
1. Mobility and Stability
The mobility requirements for the clean are slightly different. Some people experience restrictions in the wrists or shoulders when the bar is sitting on the shoulders in the front rack position. Ankle mobility restrictions are also common when attempting to maintain an upright torso at the bottom of the clean.
When evaluating mobility, be sure you also have control and stability throughout your entire range of motion. Sometimes, this lack of control can cause you body to lock down in its attempt to create a more stable position, thereby decreasing your available range of motion. The result is a feeling of “tightness” often in the hamstrings or in the lats and shoulders when reaching overhead. When you feel “tight,” you may assume that the area needs to be stretched, when in fact, what you actually need is more specific strength to create stability so your body will trust you in that position. If you’ve been stretching a “tight” area regularly and feel like you’re not making any progress, it’s a good idea to try working on building control.
2. Connection of Pelvis and Ribcage
Maintaining alignment of the pelvis and ribcage is vital to supporting a heavy load on the shoulders without “giving” into an arched or rounded back position. This is especially true when moving and catching weight with the speed used in the lifts.
3. Preparatory Movement Proficiency and Basic Strength
Deadlifts and squats develop a great base, and the addition of front squats helps you to get stronger and reinforce the same position you’ll use in the catch phase of the clean.
4. Failure
One of the most important things to learn when performing the clean (or any Olympic lift) is how to fail safely. Your safety is always more important than your lift! That said, I also often see people drop their bars carelessly. Learning to actually drop a weight can be a bit intimidating at first, but you definitely want to do this correctly to ensure your safety as well as to protect the equipment.
When you miss a clean, the bar will fall forward, even if it pushes you backward. Keep your hands on the bar as it falls – don’t try to slow the bar down, just guide its path, pushing it away from you. Release the bar when it is about two or three feet from the floor. As the bar is falling, also begin to quickly move your body clear out of the way of the bar. Once the bar hits the floor, it will bounce and roll. When you know you’re out of harm’s way—usually after one bounce—go back and prevent your bar from rolling too far.
In addition to learning how to miss a lift, learning to accept and learn from your failed attempts will help you come back stronger each time you miss a lift, always moving forward. A great principle for anything in life!
5. Grinding Through the Tough Stuff
Generally the weights you’ll eventually lift in the clean will be heavier than in the snatch. Most people don’t struggle to stand up out of a snatch unless the bar is wildly out of position. However, with the clean, you’ll need to dig deep and keep pushing when you start to get stuck while trying to stand up. If you stick with it and keep pushing, you’ll often find unexpected success!
Master Your Positions and Transitions
Practicing the following positions and movements for the clean will set you up for a successful lift. Drill them often, especially when you’re first learning.
The Clean Grip
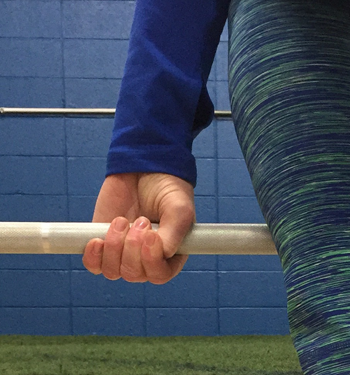
Most people tend to grab the bar with their hands too close together. You can alter the width of your grip over time until you find what is most comfortable and effective, but at the start, place the tip of your thumb about a half inch to one inch past where the knurling (the rough part of the bar) starts, lay your thumb flat along the bar, and then grasp the bar. It may feel wide at first, but it should place the bar at just the right spot on the thigh in your power position.
The Hook Grip
The hook grip allows for a more secure grip on your bar and is best learned early on. It’s never fun, but I promise you, it truly helps! When you grab the bar, simply place your thumb around the bar first, then place your first two or three fingers (index, middle, and possibly your ring finger, depending on the size of your hands) on top of your thumb and around the bar. Ouch, I know, but with practice you’ll get used to it over time and it will strengthen your pull.
The “Power Position”
The first position I always teach in both the snatch and the clean is the power position. Although this is arguably the most important position to hit effectively and consistently, this is also the most often missed position in a lift.
You should feel as if you could jump from this position. The legs are loaded, you’re connected to the ground, and you’re ready to explode up into the finish of the pull to transfer all that force to the bar before getting yourself underneath it.
To find your power position:
- Stand holding a bar in front of your thighs and make sure you can wiggle your toes. Place your feet directly under your hips. You want your weight to be in the middle of your foot – not all the way in your heels nor into your toes.
- Hold the bar with a clean grip and hook grip as described above – with your hands just a little wider apart than one thumb length from where the knurling starts.
- Unlike with the snatch, the bar should rest against your upper thigh, not in the crease of your hip.
- Open up your chest, pulling your shoulders down and back – referred to as “setting your back.” However, be sure to keep your ribs and pelvis aligned to avoid arching or rounding your back.
- Keep your shoulders directly over the bar and your arms relaxed.
- Bend your knees and keep your torso vertical. Be sure the bar doesn’t move down the thighs.
- Your legs should be bent about 30 to 45 degrees, and you should feel as if you could jump from this position.
The Turnover
It’s best to first learn the turnover slowly. Reinforce your movement pattern first, and then speed it up. This is easiest when using a very light bar or even a PVC dowel so you can focus entirely on the pattern.
- Starting in the power position, straighten the legs and pull the bar (or PVC dowel) up your body, leading with your elbows pointed toward the ceiling.
- Once you’ve reached the highest point, the bar should be at about chest level.
- Pin the bar to your chest and begin to spin your elbows around the bar until they are pointing straight out in front of you (or as high as you are able to get them).
- Keep the bar as close to the body as possible throughout the entire turnover.
- The bar should roll onto your shoulders as your elbows come up.
- Allow the bar to roll onto the fingertips as necessary, but keep as many fingers on the bar as possible.
5 Key Clean Positions and Movements
The tempo of the clean should accelerate throughout the pull.
Begin with control and finish with power. For best results, create consistency hitting these key positions:
1. Start position – SET
- The bar is at mid-shin level. This is the height of the bar with bumper plates when set on the floor.
- Feet are about hip width apart, with the mid-foot under the bar
- Knees are bent with the hips higher than the knees, and the shoulders higher than the hips.
- The chest is lifted, the back is neutral, and the head is up with the eyes looking straight ahead.
- Grab the bar using the clean grip and hook grip as described above.
- Arms are straight but relaxed. The pull will actually come from pushing with the legs.
2. Lift-Off – CONTROL, PATIENCE
- Lift the bar from the start position to just above the knees. This movement — from the moment the bar leaves the floor to the point when it is just above the knee — should be controlled. This is the set-up for the lift. The acceleration and explosive power come later on.
- Push with your legs to bring the bar up and in, toward your knees. Your legs will straighten out slightly.
- Maintain your chest and back positions, keeping the shoulders over the bar
- Hips and shoulders move upward at the same time, maintaining the same angle.
- Arms stay straight throughout this movement.
- The bar should remain close to the legs. Don’t allow it to drift out in front of you.
- Don’t rush the lift-off. Remember, the explosive part of the lift comes later.
 3. From Above The Knees to Power Position – ACCELERATE
- After the bar passes the knees, bend the knees again quickly to prepare to explode – just as you would if you were preparing to jump.
- The torso now becomes upright.
- The bar accelerates up your thigh into your power position.
- Arms are still straight.
4. Power Position to Finish Off The Pull – EXPLODE
- In the power position, push with your legs explosively, as if you were jumping. Just be sure to jump hard and not
- At the end of your explosion, allow the shoulders to shrug, to finish the force transfer to the bar and help you begin your descent under the bar.
- At this point, the bar will continue to move upward due to the force of your explosion. Do not pull the bar up with the arms.
- Keep the bar close to your body and keep your elbows high.
 5. Catching The Bar on The Shoulders/Turnover – SPEED
- Time the “catch” of the bar to receive the weight of the bar on your shoulders at the same time that your feet hit the ground.
- Land with your feet a little wider, the same as your squat stance, then descend into a front squat position.
- If you turn the bar over correctly, it should not crash into you. Try to meet the bar as you turn it over and then descend into your squat with the bar on your shoulders.
- Maintain a solid, connected body position and “sit tall” to create a strong position with an upright torso.
- To perform a power clean, you will catch the bar in a semi squat (thighs parallel to the floor or higher) then return to a standing position.
- To complete a full clean, descend into a full front squat and then return to a standing position.
 6. Return to Stand and Finish – STRENGTH
- Drive through the feet, pushing into the floor.
- Maintain the same upright torso as in the bottom of the squat or catch position — people tend to let their hips drift back. If your hips start to drift, focus on maintaining the connection between the pelvis and the ribcage.
- Continue pushing the elbows toward the ceiling to prevent yourself from rounding forward and losing the lift.
- Be prepared to grind it out! Just keep pushing and pushing but be sure to stay tight. As with any lift, be smart! If you begin to lose position, be prepared to drop your bar safely as mentioned above.
Begin by learning and drilling these basic positions, starting light—even with just a PVC dowel—and working your way up over time. While it doesn’t (and shouldn’t) replace the instruction of a qualified, experienced coach, it will start you on an amazing, frustrating, exhilarating journey, on which you’ll build significant strength and power, learn to go all-in and trust yourself and your abilities!
Save $200! Early bird price for the Women’s Strength & Empowerment Weekend ends soon!
The Women’s Strength and Empowerment Weekend, powered by Girls Gone Strong, was designed to create a space for women to rise, teach, lead, learn, and connect with one another. Throughout the weekend you’ll hear from some of the most well-respected women in the world from every facet of the health and wellness industry, from PhDs to Registered Dietitians to top CrossFit athletes, and pre and postnatal fitness and body autonomy experts.

You’ll be surrounded by a group of like-minded, strong women who are there to lift each other up, and help each other become the best version of themselves in a warm, welcoming, and inclusive environment.
You will leave the weekend feeling heard, loved, supported, and empowered and most importantly knowing that you have finally found your tribe.
Last year we sold out in just 26 hours, so if you’re interested in attending, click the button below.
The post How to Perform A Barbell Clean appeared first on Girls Gone Strong.


