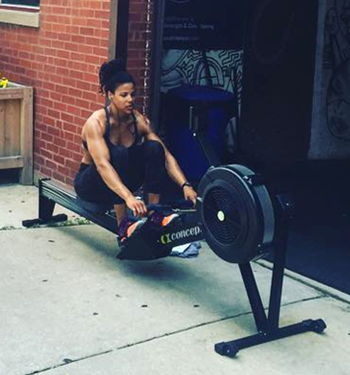
The indoor rower, originally developed as a training tool for water rowing, has become a preferred training tool regularly used by athletes and fitness enthusiasts across many levels of fitness and ability.
Indoor rowing is infinitely more accessible than water rowing, both in terms of physical convenience and required skill. However, the indoor rower is — with the exception of Crossfit gyms, where they get a lot of love — one of the most under-utilized resources available in many mainstream fitness facilities and chain gyms.
If your gym has a rower, also known as an ergometer (erg for short), chances are it’s either tucked into a corner, rarely occupied, or it’s hiding in plain sight, dwarfed by the multitude of treadmills, elliptical machines, and other more traditional pieces of equipment most people use for cardio and conditioning.
Why aren’t more people rowing? Why is the erg in such low demand at most gyms? I suspect it’s because there’s a lack of information about its utility and versatility. At first glance, the rower can seem intimidating or complex compared to running on a treadmill or pedaling a stationary bike. If that’s the case for you, I hope this article will have you running straight to the gym to give the erg a try!

Register for the Women’s Strength and Empowerment Weekend!
Spots are going fast, and it always sells out!
What’s there to love about rowing?
Rowing as part of a training program can be beneficial for a broad range of people. Three major elements make indoor rowing a worthwhile endeavor to add to your arsenal of training tools:
- Total Body Training. Technically sound rowing will work all the major muscle groups. Upper and lower, front and back side of the body, rowing hits it all. Additionally, proper rowing moves the body through a range of motion that can help improve mobility in some people. Rowing is a great tool for training to change body composition and/or improve overall conditioning.
- Non-Impact Activity. Regardless of fitness level or training goals, anyone can benefit from integrating training that reduces the amount of hard impact the body endures during a training session.
- Versatility. With this one piece of equipment, there are endless options for configuring a workout. Varying duration and intensity, performing intervals, or combining rowing with bodyweight movements in a circuit are just a few of the ways the erg can be used to create a broad range of training options.
 Get To Know The Rower
Although there are various rower manufacturers, the basic components will be consistent across the board.
- Foot Plate. Every rower will have a place for you to plant your feet and strap them in. Adjust the foot plate so that the strap is positioned around the ball of your foot.
- Display Monitor. Though the display monitor may look different from model to model, all displays usually provide the basic information you need to track, including helpful details such as your strokes per minute (stroke rate), and your split time (the amount of time it will take you to row 500 meters based on your current output). The monitor may also allow you to program a specific workout, such as customized intervals, and workouts based on time or distance. I recommend that you spend some time exploring the options on the display to become familiar with the basic settings. For more detailed information about the rower at your gym, find out the name of the manufacturer, and check out their website.
- The Damper. This is the lever on the side of the flywheel and fan housing.* The rower uses air resistance, which can be increased or decreased by adjusting the damper up or down to increase or decrease the airflow into the flywheel. Adjusting the damper setting isn’t necessary to increase the difficulty of your row. Start with the damper setting in the 3-5 range and over time experiment with the setting to find what is most effective for your training goals.* Though most of the rowers found in commercial gyms feature a fan and a damper as I just described, your gym may have a water rower instead. Water rowers feature a water-filled tank in place of a fan. The basics tend to be the same, otherwise.
Rowing Technique
Once the machine is set up, let’s talk about what you’re doing with your body. There are four key phases to rowing on the erg.
Catch:
- This position is at the front or beginning of the stroke.
- Sit with a tall, straight back.
- Hinge at the hip so the torso leans forward.
- The shoulders should be in front of the hips.
- The shins should be vertical, or as vertical as comfortably possible.
- The arms should be extended, leading into a flat wrist.
- Grip the handle with a secure, but not overly tight grip.
Drive:
- Initiate the drive with the force of the lower body.
- Push through the legs, while simultaneously keeping the back and shoulders engaged so that the hips and shoulders are moving backwards at the same rate.
- Once the legs are extended, lean the torso slightly back, again, hinging at the hip.
Finish:
- Extend the legs and torso, leaning back.
- Pull the elbows back, bringing the handle to your sternum/upper ribs.
Recovery:
- Release the arms first, allowing the tension on the rower handle to draw them to extension.
- Hinge at the hip to return to the forward lean position.
- Draw the hips back in towards the front of the rower to return to the catch, at which point the next stroke begins.
Additional Performance Points:
- The sequence performed on the drive should be performed in reverse in the recovery.
- The drive should be faster and more power powerful than the recovery, by half. Treat the recovery as just that: an opportunity to take a breath.
- You don’t have to have a higher stroke rate to improve your rowing times. Generating power per stroke (more meters, or calories) is not a result of having a higher stroke rate, but of more work output during the drive.
- Keep the handle moving in a straight line and maintain tension on the chain throughout the duration of your stroke.
2 Common Rowing Technique Errors to Avoid
Rowing will feel like a smooth, natural movement once you get the hang of it. When starting out, though, mastering the sequence of the drive and the recovery takes a little practice (the drills in the video below are great practice!).
It’s not uncommon for a beginner to mis-time the arm bend on the drive or the knee bend on the recovery. Premature arm bend occurs when an athlete begins to pull with their arms before they have completed the leg extension and lean-back of the drive. A premature arm bend reduces the amount of force the athlete can transfer from their lower body (through a firmly positioned torso and arms) into the rower handle, decreasing the efficiency of each stroke. Premature knee bend occurs when on the recovery, the athlete begins to bend their knees before they have fully extended their arms and completed the lean forward, impeding the smooth, straight path of the handle.
Putting It Into Practice
A helpful way to reinforce good habits in your rowing is to break the compound movement down into smaller pieces, or slow the movement down. Watch the video below for a demonstration of three rowing drills: arms only rowing, arms and body rowing, and paused/tempo rowing.
Sample Workouts
Once you’re feeling comfortable with your rowing technique, give one of these workouts a try.
Warm-up for each workout with a 500-meter row, followed by 5 to 7 minutes of the drills reviewed in the video above.
Workout 1
- 5-10 Rounds — Row 200 meters, rest 2 minutes, repeat.
Workout 2
- Row for 16 minutes, alternating between 2 minutes at a challenging pace and 2 minutes at a recovery pace
Workout 3
3 Rounds For Time:
- Row 300 meters
- 20 sit-ups*
- 10 push-ups
Save $200! Early bird price for the Women’s Strength & Empowerment Weekend ends soon!
The Women’s Strength and Empowerment Weekend, powered by Girls Gone Strong, was designed to create a space for women to rise, teach, lead, learn, and connect with one another. Throughout the weekend you’ll hear from some of the most well-respected women in the world from every facet of the health and wellness industry, from PhDs to Registered Dietitians to top CrossFit athletes, and pre and postnatal fitness and body autonomy experts.

You’ll be surrounded by a group of like-minded, strong women who are there to lift each other up, and help each other become the best version of themselves in a warm, welcoming, and inclusive environment.
You will leave the weekend feeling heard, loved, supported, and empowered and most importantly knowing that you have finally found your tribe.
Last year we sold out in just 26 hours, so if you’re interested in attending, click the button below.
The post Getting Started With Indoor Rowing appeared first on Girls Gone Strong.


